An exciting few days of work on the stage wrapped up today, and I'm already learning things!
I started by taking a screenshot of the stage map from www.Rally-maps.com and importing it to Blender as a plane.

Next I created some rough terrain using the BlenderGIS plugin, imported the .KML route as a curve, then generated the roads from the GIS plugin and cut them up into individual, continuous segments. The goal here was to make it easy to apply a road template to each segment.


After this I created a road template using some placeholder textures. The template is 10m x 30m, with a mesh made of 2m x 2m squares. I assigned the outer two squares to a vertex group labeled "Grass_Hard_Dry" and the inner to a vertex group labeled "Tarmac_Fine_Clean_Dry". I imagine as I get further into the project I won't have an entire road surface that uses the physics of one surface, but I think this is a good starting point.


After this a applied the Shrinkwrap modifier to each continuous-road-segment curve that I created from the OSM-highways data. I shrinkwrapped each curve to the terrain I imported from the GIS plugin. I found that it was important to have the box with the arrow pointing to it selected, so that the curve's Z-coordinates (the ones being shrinkwrapped) have an influence on the road mesh attached to it. Also, I found it was better to use the "project" wrap method, using the default "nearest surface point" would alter the X and Y shapes of the curves in areas where the topology was particularly coarse.

Next I applied the Array and Curve modifiers to the template, (and repeated this step for every curve).

Now I was getting somewhere I had a map of Monza and the surrounding service roads, but I ran into an issue. I wanted to make sure the textures were tiling right, to I put some text onto each surface and...
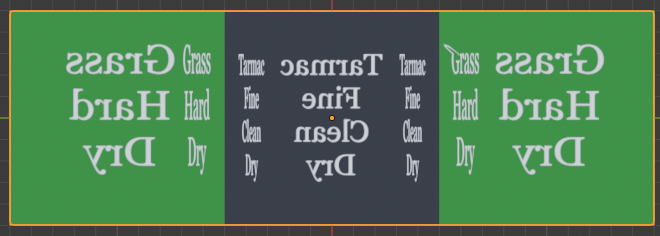
I didn't check the UVs before creating ~50 copies of the template...
So, I corrected the UVs for each road, then I applied some RBR textures I grabbed from the Cote D'Arbroz and Falstone stages, and here's the final result!


Now, of course things look a little rough still. The next HUGE undertaking will be fixing all of the intersections, and figuring out what to do with the textures at each intersection. In the little experience I've had making stages in the past I've always had issues getting the intersections to look nice, so I suppose this is sort of a trial-by-fire approach to learning how to do it.
I've also found I'm learning quite a bit about the process, so, in addition to documenting the progress here on the blog, I'll be making a "RBR Stage Creation Workflow" document, and I intend to share it with the community when I finish.
That's all for now, V0.2 may not be for quite a while now, I have a lot of work to do with the intersection meshes and textures! Until next time,
-Shane


