Showing posts with label Serraglio. Show all posts

Thursday, January 6, 2022

RBR Rally Monza: Serraglio Update

 I have decided to officially put this project on hold.

Making this was great fun and helped me get through some semesters of engineering school. That being said, I need to put my efforts elsewhere for now.


As I was going into this project completely blind I made a number of mistakes from the beginning that have really hampered progress in the latter half of the project. I would like to take what I've learned here and put that to use in creating another stage. And later on return to Monza with the knowledge I've gained.


I don't want to produce anything that isn't of high quality, and as it stands right now I can't pursue developing Monza with my current knowledge.

It has been a great process, and I would like to return in the future.

Thursday, April 8, 2021

RBR: Rally Monza Serraglio V0.5

Big update, literally. V0.5 marks the completion of the large buildings on the Monza campus.

 The definition came through Open Street Maps. Anything that the GIS plugin would classify as a "building" I modelled and textured.

The GIS plugin adds the approximate shape of each building with a nominal height. 

This is what the top-down view looked like after adding all of my buildings.

The process was a little tricky at first, but luckily Monza is well documented on google images, youtube, google earth, and in almost every racing game. So I had plenty of resources to get reference images or photos from. My goal is to model the whole Monza campus, not just the parts used in the Serraglio stage, this way the grounds can be used for other stages, or just as a free-roam.

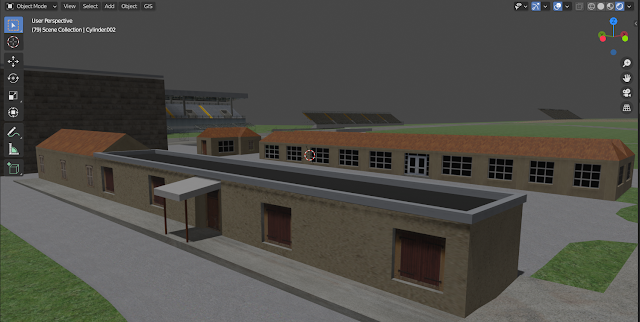
Below is a closer look at some of the buildings I created:


After booting up the stage in RBR things don't look terrible either. I can't say they look particularly stunning, but my hope is to do a ground & building texture overhaul in V0.9. To be fair, in the picture below there are now shadows or vertex colors. I also noticed my alpha textures didn't show up how I expected them to, but again, I'm not too concerned about it. I'm waiting to do most of my serious texture work when the RBR-Blender plugin is released. 


My plans for V0.6

I will be adding all of the smaller details along the stage that really bring it to life, I've broken them up into 3 categories:
  • Rally Objects: Anything specific objects only there for the rally, and impact how you drive the stage:
    • Haybales 
    • Arrows
    • Barriers
    • Timing Gates
  • Signs and Advertisement
    • Road signs
    • Placards
    • Billboards
  • Roadside Objects 
    • Fences
    • Vehicles
    • Spectators / Marshalls
    • Light posts
    • Small Buildings
As this is a pretty big task, I hoped breaking it up into these smaller segments would help it seem more achievable.

That's all for now, until next time,

Shane


Wednesday, April 7, 2021

RBR: Rally Monza Serraglio V0.4

 A bit of a different update this time around, the last couple weeks have been mostly experimentation. My original plan was to do all of the vegetation surrounding the track, but one I realized how resource-intensive that would be I decided to same that for the end of the project. Additionally I spent a couple days learning to use Wallaby so I could test the track.

While I will be doing my official vegetation near the end, I'd still like to share some of what I've worked on.

To start, I made a list of all of the vegetation native to the Po Valley in Lombardy (where the city of Monza is). I also recorded the min and max height of each plant too. Here's what the list ended up like:

This is just the list for trees, I also have a list of small trees, bushes, and grasses. 

From there I found the best way to find pictures of the plants was to search for their scientific name on google images (e.g. Salix Alba instead of White Willow). This was useful because it usually yielded a picture of the tree in question alone, and with the whole plant in frame. This makes it very easy to edit into a texture for use in Blender.


From here I edited out the surroundings in gimp, saved it as a .dds file and put the tree in blender using the "images as planes" import tool.

Next was a long rabbit-hole looking into geometry nodes of distribution of vegetation and such, here are the results of my experimentation:


The real track would have far fewer trees, I just wanted to see if I could quickly distribute trees across the track. This of course makes blender run very slowly, and is what guided my decision to do vegetation at a later date.

I wasn't planning on stopping here and calling it "V0.4" as there isn't really much that has changed. My plan was to add all of the large buildings around the track and that would be "V0.4", but I ran into an issue...


When measuring the length of the pits in google earth and comparing to the GIS plugin data, I noticed a discrepancy.

Length of starting grid is about 310 meters, but on my GIS in blender, the length of the grid is 445 m! Much longer!


After driving the stage in RBR when doing some testing and driving the official track in Assetto Corsa, I thought something seemed off, but I thought it was just because I didn't have any buildings in yet. Now that I've scaled everything by 70% it matches up very nicely. With this big change I decided to cut my losses and start to work on another version.

Next update will have more progress! Goal is to get all of the major buildings around the Monza-campus modelled and textured!

That's all for now,
Shane

Sunday, March 21, 2021

RBR: Rally Monza Serraglio V0.3

Since the last update I've made some good progress on the stage, but it'll be a shorter update this week as  there isn't a whole lot I did, just one process like 100 times...

After much work, I'm happy to unveil, the completed terrain and road mesh (what will become the "ground" mesh in Wallaby.


The large white cubes are placeholders for buildings, courtesy of Open Street Maps. This was a long process but I'm very happy with the results. I'm glad I decided to build the road network then add the terrain in between, I think for this stage in particular it worked well because it covers a relatively small area. I've also added a few new service roads to the top half of the map that weren't present in V0.2. 


My basic workflow was to select the area to fill in from edit mode, press 'F' to fill the area, and 'I' to inset faces. Once I got the hang of that things went pretty smooth.

In addition I've also created the banking and supports for the Monza Oval:

For texturing large areas like the parking-lots, I found it useful to select the faces I wanted to be tarmac, unwrap them ( 'U' then 'U') then unwrap them using a lightmap pack ('U' ; 'L' ; 'Enter'). After that I'd use the "Align Similar" function in UV Packmaster to get the UVs aligned, and place them over the tileable tarmac texture in my texture plate. 

For V0.4, my goals are as follows:

  • Further detail the terrain as my LIDAR data wasn't very exact. 
    • This will involve following along with the onboard footage and adding details as I see them
  • Learning to use Wallaby for basic track exporting
  • Creating a drivable test track that is the entire mesh from V0.3
  • Map out some basic vegetation placement, get an idea of what assets I need to create
Through some initial testing I understand Wallaby is a bit hard to work with at times, but that's okay, I'm looking forward to learning!

That's all for this update, until next time.
-Shane
 

Monday, March 8, 2021

RBR: Rally Monza Serraglio V0.2

 After a couple weeks of work and a good deal of trial and error, I have completed V0.2 of Serraglio. My goal for this version was to get all of the roads in with intersections, proper textures, and more accurate height data. 

First I did a google search for LIDAR data of the Monza / Lombardy area. Luckily I was able to find this great blog that lists sites where you can find data for places all across Europe. The blog sent me to the Lombardy's geoportal for data downloads here. After some sorting and searching I finally settled on a database that is accurate to within 5 meters of the whole region. While I know this isn't perfect it was the best I could find, and its certainly better than the 30m accurate GIS data. I followed this guide for converting point clouds to meshes. Once in Blender I had to delete the data points I didn't need and find the 2 square km area that I needed. Fortunately Monza is located near some pretty distinct mountain faces and I was able to get the area almost exactly.


After cutting out big chunks of the scan that I didn't need, I narrowed search window to the circle that can be seen on the map. The final adjustments came as I was able to match up the rivers that run near the circuit.

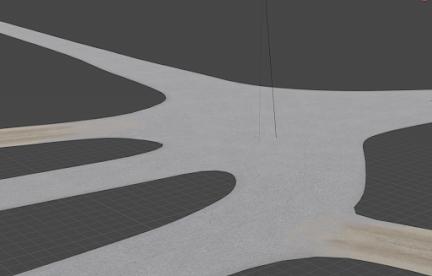
Next it was time to figure out how I wanted to model the intersections, my first trial was doing one of the trickier spots right at the beginning of the stage, a 5-way intersection with 2 dirt roads and 3 tarmac roads.


Some initial testing to see if I could even get the geometry to look half decent, didn't end bad per se, but I still had a long way to go. My biggest breakthrough came after watching this video on YouTube. After this I essentially scrapped the work I had done in V0.1 and created the roads from scratch, I still used a few curves, but this method seemed to produce much better results. Seeing how easily road textures could be manipulated, and when done properly it can look really good. I have also seen some tips for using vertex colors to make roads look less flat, and here is the result of the same intersection after some testing.


I was really quite happy with the results here so I continued forward, below are screenshots of my progress over the weeks.


With all the roads completed my next task will be creating the ground mesh. Here I will learn if not creating trackside grass as I created the roads was a good idea... I'm guessing I'll have a lot to learn this go round too.


My biggest takeaways from the work of the last couple weeks:
  • If you're going to use curves and arrays to make roads, use the NURBS curve, the roads look much more natural.
  • If you have lots of intersections making the roads by hand may be preferable
  • Using a big texture plate with all road textures on it is considerably easier than having a different material for each surface.
  • UV Editing can really help blend road textures together.
  • Gravel road textures are harder to blend together than tarmac
  • WRC+ Onboards are a must have for stages like this

My plan of attack for getting to V0.3
  • Find an acceptable poly-count level for tracks
  • Work from the start of the stage to the end, doing only the necessary nearby terrain
    • Find / create any additional grass and transition textures if need be (there are many spots where the drivers have "meandered" from the racing line into grass so there's a good deal of torn up grass that I'll need to texture).
  • Once the detail terrain is created, fill in the remaining areas with larger polys
  • Look into some low poly vegetation
  • Define some rough tree and tree wall placement

That's all for now, I'm sure the next post will be just as packed with learning and mistakes, until next time.
-Shane

Tuesday, February 23, 2021

RBR: Rally Monza Serraglio - V0.1

 An exciting few days of work on the stage wrapped up today, and I'm already learning things! 

I started by taking a screenshot of the stage map from www.Rally-maps.com and importing it to Blender as a plane.


Next I created some rough terrain using the BlenderGIS plugin, imported the .KML route as a curve, then generated the roads from the GIS plugin and cut them up into individual, continuous segments. The goal here was to make it easy to apply a road template to each segment.


After this I created a road template using some placeholder textures. The template is 10m x 30m, with a mesh made of 2m x 2m squares. I assigned the outer two squares to a vertex group labeled "Grass_Hard_Dry" and the inner to a vertex group labeled "Tarmac_Fine_Clean_Dry". I imagine as I get further into the project I won't have an entire road surface that uses the physics of one surface, but I think this is a good starting point.


After this a applied the Shrinkwrap modifier to each continuous-road-segment curve that I created from the OSM-highways data. I shrinkwrapped each curve to the terrain I imported from the GIS plugin. I found that it was important to have the box with the arrow pointing to it selected, so that the curve's Z-coordinates (the ones being shrinkwrapped) have an influence on the road mesh attached to it. Also, I found it was better to use the "project" wrap method, using the default "nearest surface point" would alter the X and Y shapes of the curves in areas where the topology was particularly coarse.


Next I applied the Array and Curve modifiers to the template, (and repeated this step for every curve).


Now I was getting somewhere I had a map of Monza and the surrounding service roads, but I ran into an issue. I wanted to make sure the textures were tiling right, to I put some text onto each surface and...


I didn't check the UVs before creating ~50 copies of the template...

So, I corrected the UVs for each road, then I applied some RBR textures I grabbed from the Cote D'Arbroz and Falstone stages, and here's the final result!


Now, of course things look a little rough still. The next HUGE undertaking will be fixing all of the intersections, and figuring out what to do with the textures at each intersection. In the little experience I've had making stages in the past I've always had issues getting the intersections to look nice, so I suppose this is sort of a trial-by-fire approach to learning how to do it.

I've also found I'm learning quite a bit about the process, so, in addition to documenting the progress here on the blog, I'll be making a "RBR Stage Creation Workflow" document, and I intend to share it with the community when I finish.

That's all for now, V0.2 may not be for quite a while now, I have a lot of work to do with the intersection meshes and textures! Until next time,
-Shane

Saturday, February 20, 2021

RBR: Rally Monza Serraglio - V0.0

Today marks the first day of work on the Serraglio stage for Richard Burns Rally. 

Project goals

  • Learn techniques and procedures for making a RBR track
  • Document the process well
  • Create a guide of sorts for future mods
  • Learn more about efficient texturing and UV editing in Blender
  • Create an accurate recreation of Monza

I've wanted to create content for RBR for some time now, having owned the game for nearly 10 years I finally decided to take the plunge. Here is the Blender workflow I'm envisioning right now:
  1. Use GIS / LiDAR data to generate terrain base.
  2. Import KML route. Or use GIS to get OSM-Highways.
  3. Clean up contiguous segments of OSM – route and convert to curve.
  4. Create Drivable surfaces on terrain.
  5. Define tree wall locations.
  6. Model surrounding buildings.
  7. Model road surface in detail. (use height maps & Deformation)
  8. Add trackside detail.
  9. Bake all textures to objects.
  10. Vertex colors? (need to learn about how to use these)
  11. Export individual objects as FBX.
We'll see how that goes as I get into the project and start editing. That's all for now, wish me luck!

About Me

Hi! my name is Shane Howell. I'm a mechanical engineering / music double-major student studying at Western Michigan University in the US...